The examples in the instructions below show the Epson Stylus Pro 7880 printer, but you’ll see your printer name instead. Be sure to have an image/print job open in Adobe Photoshop and ready to print before beginning with the steps below.
Selecting Your Adobe Photoshop CS3 and Printer Driver Settings
- Open the File menu in Adobe Photoshop and select Print.
- Under Color Handling, choose Printer Manages Color.
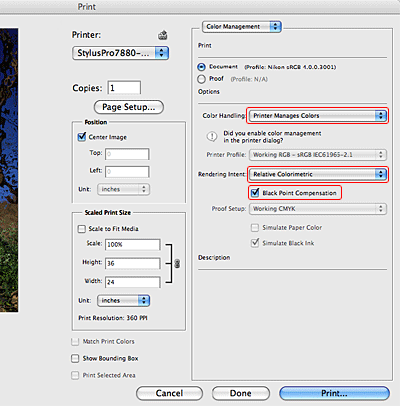
- Select Relative Colorimetric as the Rendering setting.
Note: If your image contains very saturated colors, select Perceptual. This reduces the color saturation so that the colors fit within the printer’s color gamut. - Select the Black Point Compensation checkbox, if available.
- Click the Print button. Your printer driver’s Print window appears.
- Select your printer from the Printer menu.

- If necessary, click the
 button to expand the Print window.
- Select Print Settings from the pop-up menu.

- Select EPSON Standard (sRGB) or Adobe RGB for Color Settings.
Note: Many customers select EPSON Standard (sRGB) for this setting.
- If you’re printing from an Epson Stylus Pro 4880, 7880, 9880, or 11880 printer and your prints are coming out dark, click on Advanced Color Settings and change the default Gamma setting from 2.2 to 1.8 (previous Epson Stylus Pro printer models have a default Gamma setting of 1.8). Click Basic when done.

- Click Print to begin printing.
