The examples in the instructions below show the Epson Stylus Pro 7880 printer, but you’ll see your printer name instead. Be sure to have an image/print job open in Adobe Lightroom and ready to print before beginning with the steps below.
Selecting Your Adobe Lightroom v1.3 and Printer Driver Settings
- Click Print in the upper-right corner of Adobe Lightroom.

- Expand the Print Job section (you may need to scroll down to see it).
- Under Color Management, open the Profile list and select the profile for your printer that matches the paper you’re printing on.
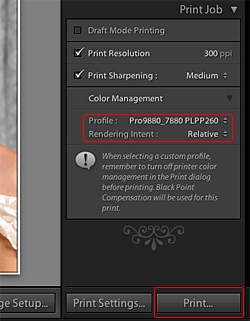
- Select Relative Colorimetric as the Rendering setting.
Note: If your image contains very saturated colors, select Perceptual. This reduces the color saturation so that the colors fit within the printer’s color gamut. - Click the Print button in the bottom-right corner. Your printer driver’s Print window appears.
- Select your printer from the Printer menu.
- If necessary, click the
 button to expand the Print window.
 - Select Print Settings from the pop-up menu.
- Select the Media Type setting for the paper you’ll use for the print. This should match the type of paper for the profile you selected in the previous Print window.
- Select Off (No Color Adjustment) for Color Settings.
Note: Make sure that you select Off (No Color Adjustment). If you don’t, the printer driver will apply additional correction to the image data, producing inaccurate results. - To identify the profile that matches each of the media types listed, click on Advanced Color Settings. Your currently selected media type and the matching ICC profile will be displayed. Click on Basic when done.
- Click Print to begin printing.
